
Managing R package installation and environment
Last updated on 2026-06-19 | Edit this page
Overview
Questions
- How can you install and organize packages in R?
- What are some best practices for setting up a project on the HPCC?
Objectives
- Explain where packages are kept and how to customize the location
- Demonstrate how to setup an RStudio project
- Share ways to effectively organize your projects for collaboration
Libraries
The HPCC has multiple versions of R installed, and many of those
versions have a large number of R packages pre-installed. But there will
come a time when your workflow requires a new package that isn’t already
installed. For this, you can use R’s built-in
install.packages() function.
Before we do that though, we should check which libraries we have
access to. We can do this by typing .libPaths() into the R
console:
R
.libPaths()
OUTPUT
[1] "/mnt/ufs18/home-237/k0068027/R/x86_64-pc-linux-gnu-library/4.3"
[2] "/cvmfs/ubuntu_2204.icer.msu.edu/2023.06/x86_64/generic/software/R-bundle-CRAN/2023.12-foss-2023a"
[3] "/cvmfs/ubuntu_2204.icer.msu.edu/2023.06/x86_64/amd/zen2/software/R/4.3.2-gfbf-2023a/lib/R/library"
We see three directories. The first is created for you in your home
directory. The third (or one like it, starting with
/cvmfs/ubuntu_2204.icer.msu.edu or
/opt/software-current) points to all of the packages that
are pre-installed with the base version of R. The second contains a
large set of additional packages from CRAN, forming a general base that
most users will be happy with.
When you use install.packages() in the future, by
default, it will install to the first entry in your
.libPaths().
One important point to note is that the library in your home
directory is labeled with 4.3 for version 4.3(.2) of R, the
default used by RStudio Server. If you ever use different versions of R,
it is important that the packages you use are consistent with those
versions. So, for example, if you choose to use R/4.2.2, you should make
sure that the library in your home directory returned by
.libPaths() ends in 3.2. Mixing versions will likely cause
your packages to stop working!
What’s the difference between a library and a package?
A library is just a collection of packages. When you use
library(<package>), you are telling R to look in your
libraries for the desired package. When you use
install.packages(<package>), you are telling R to
install the desired package into the first library on your
.libPaths().
What if you don’t have a user-writable library?
Sometimes, when starting R for the first time, it may happen that the
.libPaths() command won’t show you a library in your home
directory. Since the other library is shared by everyone on the HPCC,
you won’t be able to write to it.
Luckily, R knows this, and if you try to install a package, you will be offered to create a new user-writable library:
OUTPUT
Warning in install.packages :
  'lib = "/cvmfs/ubuntu_2204.icer.msu.edu/2023.06/x86_64/generic/software/R-bundle-CRAN/2023.12-foss-2023a"' is not writable
Would you like to use a personal library instead? (yes/No/cancel)
Answer yes, and you will be good to go!
Installing packages
Now, let’s try to install a package:
R
install.packages("cowsay")
You may then be asked to select a CRAN mirror. This is the location
where the package is downloaded from. Usually, 65 (or
something close by depending on what’s available) is a good choice for
us because it’s from the University of Michigan (closer means faster
downloads).
R will download and install the package. We can now use it like we normally would! From the R console:
R
library(cowsay)
say("Hello world!")
OUTPUT
 --------------
< Hello world! >
 --------------
      \
       \

        ^__^
        (oo)\ ________
        (__)\         )\ /\
             ||------w|
|| ||Do your packages require external dependencies?
Often, packages will require some extra software to install, run, or both. Getting external dependencies lined up correctly can be a big challenge, especially on the HPCC. Here are some general tips:
- Read the documentation for the package you’re using and take note of any dependencies you need and their versions. This information is also included under SystemRequirements on a package’s CRAN page.
- Make sure that software is available before you try to install/use
the R package. This could involve:
- Loading it through the HPCC module system. When using RStudio in
OnDemand, you have two options:
- Click the “Advanced Options” checkbox when you start a new RStudio Server session. The first option will allow you to enter HPCC modules you’d like to load before RStudio starts.
- Use the
modulecommand in R, preloaded when you start RStudio. For example, you can runmodule("load JAGS")from the Console to have access to theJAGSsoftware. Otherwise, you can load these packages and use R through the command line.
- Installing it yourself in a way that R can find it.
- Loading it through the HPCC module system. When using RStudio in
OnDemand, you have two options:
- If a package’s setup instructions suggest something like
sudo apt-get ...orsudo dnf install ...under the Linux instructions, this is a sign that it needs external dependencies. These methods won’t work for installation on the HPCC; instead, look for and load HPCC modules with similar names. - Sometimes you’ll need to load more than one module, but they will have dependencies that conflict with each other (or even R itself!). In this case, contact the research consultants at ICER and we will do our best to help you out.
A note about node type
The HPCC consists of many different node types. When we started our OnDemand job, we chose to use only amd20 nodes.
When R installs a package, it customizes it to the specific node type it was installed on. So if you use the same library on different node types, the packages are not guaranteed to work properly, often resulting in an “Illegal instruction error” or RStudio crashing.
To get around this, we recommend using the same node type when you use R, either through OnDemand, in job scripts, or on development nodes.
We’ve already seen how to do this in OnDemand (using the dropdown in
the Advanced Options section). You can do this in job scripts by adding
the line #SBATCH --constraint=<nodetype> (which we
will see in a later
episode).
Alternatively, you can use the tools discussed in this section to manually manage different libraries for different node types, though it can be tricky to manage properly.
Managing your projects
Now that we know how to install and use external packages, let’s talk about managing your code. When you use R, it helps to organize your code into separate directories that you can think of as projects. As we’ll see later, running R out of this project directory can make your life a lot easier!
But when RStudio starts, your working directory is always set to your home directory.
R
getwd()
OUTPUT
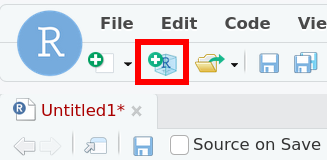
"/mnt/ufs18/home-237/k0068027"RStudio has it’s own solution to this: RStudio Projects! Let’s create one to test this out. Find the button in RStudio that looks like a plus sign on top of a cube near the edit menu.
Start by creating an RStudio Project with button that looks like a plus sign on top of a cube near the Edit menu.
Select New Directory, then New Project from the options. Under
Directory name, use r_workshop, and make sure that it’s a
subdirectory of your home directory ~. We’ll leave the
other options alone for now, but note that RStudio will integrate nicely
into a workflow using git and GitHub! Click Create Project to
finish.
Your new RStudio Project will be loaded. This means a few things:
- A new session of R will be started in the project directory.
- This directory will be your new working directory (check
getwd()!). - The file browser has moved to this directory.
- A file called
r_workshop.Rprojhas been created. This file saves some options for how you edit your project in RStudio.
At any time, you can navigate to your project directory in the
RStudio file browser and click the .Rproj file to load up
this project or any other.
Configuring your projects
What if we wanted to make some changes to the way that R operates?
There are two files that we can create to help us do that:
.Rprofile and .Renviron.
First, let’s suppose that we want to make sure we use the University of Michigan CRAN mirror install our packages. The R commands
R
r <- getOption("repos")
r["CRAN"] <- "https://repo.miserver.it.umich.edu/cran/"
options(repos = r)
will take care of this for us. To make sure this runs every time we
start R, we’ll put it in the .Rprofile file.
Use RStudio to open a new Text File and type
R
local({
  r <- getOption("repos")
  r["CRAN"] <- "https://repo.miserver.it.umich.edu/cran/"
  options(repos = r)
})
The local part ensures that no output from code we write
is available to us in the R session: just the options get set. It’s good
practice to put any code you write in your .Rprofile in a
call to local to keep R from accidentally loading any large
objects which slows down startup.
Save this in your r_workshop directory as
.Rprofile (don’t forget the leading .). Any
time R starts, it will look for a .Rprofile file in the
current directory, and execute all of the code before doing anything
else. To make this take effect in RStudio, you can restart R by going to
the Session menu, and select Restart R. To check our work, run
R
options()$repos
OUTPUT
                                      CRAN
"https://repo.miserver.it.umich.edu/cran/"
Now suppose that this project we’re working on uses some very special
packages that we don’t want in the library in our home directory. The
right way to do this is with a package manager like renv.
But for example’s sake, we’ll create a quick approximation with the
R_LIBS_USER environment variable and the
.Renviron file.
The R_LIBS_USER environment variable can be set to a
directory that you want to use as a library instead of the default one
we saw before in your home directory. If we’re running R from the
command line (which we’ll talk about
later), we could export this variable in the command line before you
start R:
But not only would we have to do this every time we run R, this
process is also hidden away behind the scenes when we use RStudio from
OnDemand! There’s another option: the .Renviron file.
Before R starts up (no matter if it’s from the command line or Rstudio),
it will look at all the environment variables in this file and set
them.
In RStudio, open a new Text File and type
R_LIBS_USER="./library"Then save this file in your r_workshop directory with
the name .Renviron. Now, restart R using the Session menu,
and check your .libPaths() in the R console:
R
.libPaths()
OUTPUT
[1] "/mnt/ufs18/home-237/k0068027/r_workshop/library"
[2] "/cvmfs/ubuntu_2204.icer.msu.edu/2023.06/x86_64/generic/software/R-bundle-CRAN/2023.12-foss-2023a"
[3] "/cvmfs/ubuntu_2204.icer.msu.edu/2023.06/x86_64/amd/zen2/software/R/4.3.2-gfbf-2023a/lib/R/library"
Great! We can even check that we’ve isolated ourselves from the
default home directory library by trying to load
cowsay:
R
library(cowsay)
Error in library(cowsay) : there is no package called 'cowsay'Other configuration locations
The .Rprofile and .Renviron files don’t
have to live in the directory you start R from. In fact, R checks for
them in a set order:
- In the directory where R is started.
- In your home directory.
- In a global directory where R is installed. On the HPCC, this is the
file
$R_HOME/etc/Renviron(you can check where$R_HOMEis withSys.getenv("$R_HOME")).
and uses the values in the first one it finds.
This means you can set a more global configuration by putting
environment variables and startup scripts in the .Renviron
and .Rprofile files in your home directory. However, if you
forget what defaults you setup there and you try to move to another
computer, you may have trouble running your code again. It’s best to use
these home directory files sparingly to preserve portability.
Packages for later
Install the following packages in your r_workshop
project library:
futuredoFutureforeachfuture.batchtools
Check to make sure these install into the right library.
Double checking our library paths
R
.libPaths()
OUTPUT
[1] "/mnt/ufs18/home-237/k0068027/r_workshop/library"
[2] "/cvmfs/ubuntu_2204.icer.msu.edu/2023.06/x86_64/generic/software/R-bundle-CRAN/2023.12-foss-2023a"
[3] "/cvmfs/ubuntu_2204.icer.msu.edu/2023.06/x86_64/amd/zen2/software/R/4.3.2-gfbf-2023a/lib/R/library"
we see that our r_workshop/library directory is
first.
If we install future, it goes into this directory:
R
install.packages("future")
OUTPUT
Installing package into `/mnt/ufs18/home-237/k0068027/r_workshop/library`
(as `lib` is unspecified)
A quick way to see which packages are installed in which library is to run
R
lapply(.libPaths(), list.files)
Startup and shutdown code
The functions .First and .Last (that don’t
take any arguments) can be defined in the .Rprofile file to
run any code before starting and after ending an R session respectively.
Define these functions so that R will print
### Hello <user> ### at the beginning of an R session
and ### Goodbye <user> ### at the end (where
<user> is your username).
Restart your R session to test your solution.
As a bonus, use Sys.getenv and the USER
environment variable to say hello and goodbye to whoever is using the
.Rprofile.
Note that since we are setting variables that we want to keep in our
session, the following lines should not be included in the
local block in the .Rprofile file.
R
.First <- function() cat("### Hello", Sys.getenv("USER"), "###\n")
.Last <- function() cat("### Goodbye", Sys.getenv("USER"), "###\n")
Best practices for a portable project (and when and how to break the rules)
It is very likely that you are not the only person working with your code: there are other people in your lab or outside that you should be ready to share your analyses with. There are a few ways to setup your R project to make things less painful to share.
And even if you’re not collaborating, you’re still sharing with future you! Staying organized will help you return to an old project and get up and running faster.
Tips:
- Don’t leave
install.packagescommands in your scripts. Run them from the R console, and document what you need so that others can install them themselves later. Or better yet, get a package isolation solution to do it for you, as discussed above. - Organize the files in your project into separate folders. A commonly
used setup is something like
-
data/for raw data that you shouldn’t ever change -
results/for generated files and output (e.g., you should be able to delete this folder and exactly regenerate it from your code.) -
src/for your code, like.Rfiles -
bin/for any other programs you need to run your analyses -
doc/for text documents associated with your project
-
- Use relative paths inside your project. Instead of using
C:\Users\me\Documents\lab_files\research\experiment1.csv, putexperiment1.csvinto thedata/directory in your project folder and only reference it asdata/experiment1.csv. - Reuse your code. If you need to run the same analysis on two
different inputs, don’t copy your script and find-and-replace
data/experiment1.csvwithdata/experiment2.csv. Instead, structure your script as a function that takes a filename as input. Then write a script that sources the script your function is in and calls that function with two different filenames. - Separate the steps in your analyses into separate scripts (which
ideally wrap the step into a function). You can chain all of your
scripts together in one
run_all.Rscript that sets up your input files and runs each step on those inputs in order.
All of this being said, rules of thumb can always be broken, but you should have a really good reason to do so. Oftentimes, using a supercomputer can be that reason.
For example, you may be using the HPCC to analyze some very large
files that wouldn’t be easy to share in a data/ directory
under your project. Maybe these live in your group’s research space on
the HPCC so you don’t have to copy them around. In this case, it might
make sense to use an absolute path to this file in your R scripts, e.g.,
/mnt/research/my_lab/big_experiment/experiment1.csv.
If you do decide to do this however, make sure you only do it one
time! This is a great use for the .Renviron file. Instead
of directly typing /mnt/research/my_lab/big_experiment/
into your code, set this as an environment variable in your
.Renviron:
When you need to access this directory from R, use
Sys.getenv():
R
data_dir <- Sys.getenv("DATA_DIR")
data <- read.csv(file.path(data_dir, "experiment1.csv"))
If somebody else wants to use your project outside of the HPCC and
downloads the data on their own, they just have to set the
DATA_DIR variable in the .Renviron file once
and for all. This can be a great place to keep user specific
configurations like usernames, secrets, or API keys.
- The
.libPaths()function shows you where R looks for and installs packages - Use the
.Renvironfile to set environment variables you’d like to use for your project - Add functions and set options in the
.Rprofilefile to customize your R session - Start R from your project directory and use relative paths